Pages

Tuesday 31 December 2013

Craft - Handbag upcycle

Happy New Year!!! Woohoo!! There is always something special about the start of a new year.

This year I am determined to do a lot of thing,  such as finishing last year's "To Do" List. I am also determined to sort out my wardrobe. Anything bland is going to get a makeover or will be donated to charity.

Today I have sorted out my handbags. Many of my bags are older than my boys and are very worn out. There are far too stains from baby bottle spills and those sticky leftovers that kids always seem to stuff into my handbag when we are out.

I have a few bags that are still in good condition, mainly because they were so boring that I never used them.

 Time to get to work to make this bag a little bit more me. I have used beads and ribbon from an old piece that was too worn out to fix.

My After Photos.
I have restrained myself from going too extravagant. I think it is fun but still a little classy at the same time.  I have a brown handbag to do next but I first I need a trip to my local Spotlight store to get inspiration and materials. 

I hope you have a wonderful New Year's Day and that this year is kind to you and your family. 

Sunday 29 December 2013

Recycling - New uses for old suitcases.

I am still trying to clean up the shed. Very slowly things get pull out and given a new lease on life. I had a few old suitcases that weren't suitable for traveling but still too good to be thrown out.

The first suitcase belongs to the boys but they have outgrown it. Now they want to pack more clothes than I do. They are ready for larger suitcase so poor Buzz is getting a make over.

 After a few hours of school holiday crafting fun, the suitcase has been transformed into a work of art.
This will be eventually wall mounted to match the rest of the bedroom.

The other suitcase I had was turned into a small sandpit. The youngest child loves playing in the sandpit but as it is summer the sand gets very hot. The wet season is meant to be here now/ soon/ whenever it wants to show up, so I have made an undercover sandpit. The beauty of this is that I can close the lid to keep out animals.

Christmas - May the force be with you

Ok. I know I am very late with sharing my tree... or I am really early for next year.

I wanted to do something different this year with my Christmas tree.  Every year I do a traditional tree but I wanted to do something for my boys this year.

I bought a black tree and Mum helped sew the cape. I bought some Hallmark Star Wars ornaments, but I couldn't afford many. Most of the decorations were out of Kinder Surprise chocolates. They had Star Wars themed toys and despite our best efforts in eating heaps, we never managed to find Jar Jar Binks or R2-D2. The boys volunteered to keep eating chocolates but our local supermarket sold out of the Star Wars range.


Here are the older boys with their special tree.

The boys loved their tree. We put up the tree at the end of November and my little foster son kept plucking the decorations off so that he could play with them. By Christmas Day the tree was looking a little bare but luckily everyone was too distracted by the presents.  It is surprising how many people came in and didn't even notice a giant Darth Vader in the middle of the lounge room.

May the force be with you this Christmas... or next Christmas. :)

Saturday 21 September 2013

Craft - My fun new bedroom lamp

It is rather embarrassing to admit but this lamp project took me 9 months.... I'm not sure why either.  I painted the lamp around Christmas time and it has sat in the shed ever since. I just didn't get around to doing something with the lamp shade or finding that little black plastic bit that holds the lamp shade still. If anyone asks I will say I was letting the paint cure.

Anyway here are before photos.


And the before of the lamp shade.
The lamp base was in good condition but it was brown. I am trying to get rid of boring colours in the house so this needed a paint. The lamp shade was old so I really wasn't sure how I was going to upcycle it. This was another project where I was determined that I wasn't spending any money which really limited what I could do.

I got out the fabric markers and let the kids help me decorate it. I figured the lamp shade was so old that if it didn't turn out I would throw it away or recover it with fabric.  The boys took turns to decorate a panel each. Three of us went for an outdoor garden theme but one of my boys drew himself as a red Power Ranger. He currently has a Power Ranger obsession so I wasn't surprised with his choice. Here is his contribution. It think it is awesome.

My boys aren't into craft so a quick colouring in project is perfect for them. I have a few little craft projects for the boys to do over the school holidays as we need to make a start on Christmas presents and cards.

Now here is the finished bedroom lamp. I love it. The flowers were crochet flowers I bought on ebay a while ago. I also added a few random buttons that I found around the house. It is certainly unique and I know many people wouldn't like it but it suits my room and my personality. I still haven't found that plastic bit that holds the lamp shade still but it will turn up eventually... the shed isn't that big.


Furniture renovation: Foot stool - almost too nice for feet.

I bid on something at auction and this foot stool happened to come with the item I wanted. I had no idea what I was going to use it for, so it has sat in the shed for a long time. 


I am trying to clean out the shed so I thought I better do something with it. I pulled off many layers of fabric. Each layer was as dusty and stained as the previous layer. Ewww.  I was determined to not spend any money on the project so I have used left over paint and fabric for the project.

I gave the timber a light sand and have painted it a light blue. The fabric has sat in my stash pile for about 10 years so it is about time that got used.
I have put it in my bedroom with my orange chair. The photos aren't that clear as my room is so dark, even in the middle of the day. The only window in there, faces the wrong way to get any decent light so please excuse the shoddy photos.
 I really like the end result. It is hard to tell from the photos but some of the flowers are the same orange as in the chair. It is quite comfortable and very clean. One of my boys really wants to claim it as a seat to use when he is playing the Wii. So now I am on the look out for another footstool for him.


Wednesday 5 June 2013

Furniture Renovation Project: My computer chair

Yeah I found time to actually finish something. Yeah I am just as surprised as you are. I hate winter and after a few grey overcast days I headed off to the hardware store to buy a tin of happy. I hadn't really decided on a colour before walking in. I just wanted something cheery. I found a lovely colour that I am happy with but the lady in the paint section was a little shocked to be mixing up a tin of orange.

I decided to paint a chair that was looking worn out and grubby. The paint was peeling off and it was very dirty. It got a big scrub and then it was time to paint it.
 I did a couple of coats of undercoat/primer and then did 3 coats of the orange.
I really like it. Hopefully looking at it will make me feel happy even when I am sitting at my desk paying bills and filling out forms. I now need to find a suitable cushion but I might have to wait until Spring to find something suitable in the shops. The muted winter stock just wont work.

Wednesday 20 February 2013

Summer Time woes

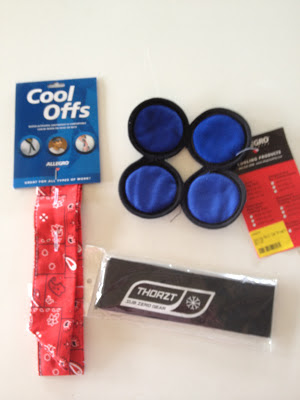
Well I'm back but not really sure where I been. The heat has been getting to me and I haven't been very productive lately.  The shed is just too hot for working in so I have been looking for cheap ideas to keep cool. I found these at a local safety store. The red and black items are scarf type things that you soak in icy water. They have some type of gel balls in them that expand and keep you cool. I found that they work well for 5-10 minutes and do help cool you down. The blue item goes inside your hat and keeps your head cool. They are meant for inside hard hats but I am going to use mine inside my gardening hat.

Seeing as it is so hot outside, I have been doing a little online shopping. My 40th birthday is rapidly approaching so I have been hunting for items that the kids can give me. I just bought this off ebay. I think the boys will like it just as much as I do. I can't quite decide if I put lollies in it or little bouncy balls. We have dozens of those small bouncy balls and I figure if I find any more on the floor then I should put them in here and the kids have put money in to get them back. Win!!!
I will clean it up and then wrap it up for one of the boy's to give me on my birthday. I have also bought another item off ebay that is yet to arrive. I still need to find two more items. If anyone spots any colourful/fun/quirky objects that would be good for my house then please let me know.

Take care and stay cool.

Saturday 12 January 2013

Project 65 - My jobs for the year.

I sat down and made a list of the projects I want to do this year. There are 65 'must do' things on this list. Some projects are fairly straight forward like finish painting the kitchen hutch but there are other personal projects such as take my vitamins each day and try to reach my goal weight of 65 kg. I wanted a big visual prompt that I would see everyday to remind me to work on these goals. But I didn't want to spend a cent on the project, after all saving money is on the list as well.

I found these items in the shed and got to work. The old sign has scribble all over it and the numbers were old house street numbers (I had a 1, 5, 6 and 7).

I spray painted the sign with a white undercoat and then used 3 different shades of orange. A dark orange for the edge of the frame and different colours of orange for the numbers. This photo below is just to see which way I wanted the numbers to face before I started decorating.

I decided that I should add my list to the board as well. To make it all fit the numbers and sign got turned around. Now came the fun part of decorating the sign with what limited supplies I had. All I have used is 2 pages of scrapbooking paper, small stickers and flowers and Washi Tapes from Downtown Tape. The Washi Tape is so much fun to use and makes life easier for a hopeless crafter like myself. I struggle with any type of scrapbooking or card making, but this tape really helps jazz things up with minimal effort or talent on my behalf.
Drum roll please. TA DA!!!!! 
There are 2 pages of typed goals listed under that cover page. Hopefully I can start crossing some of them off soon. If I get all of them crossed off by the end of the year I will be very happy.

Friday 11 January 2013

Play room TV cabinet sneak peak


I am nearly finished the TV cabinet that will go in the play room. I thought I would give you a sneak peak at it. The 'before' photo doesn't show half the dirt, grime and scratches on it.

 Mum helped my drill holes in the back for the power cords. This cabinet will hold a small TV on the top, and game consoles in the shelves area. I still need to tidy it up and seal it before it comes inside. The green is the same tin of paint that I have done a few other projects with. I only bought a small tin yet I still have more than half a tin left.


Friday 4 January 2013

Happy New Year

I know I am few days late with my New Year well wishes but I have been busy cleaning up a trail of mess that can only happen when four little boys are on school holidays. For many people the dawning of a new year always prompts us to look at what we hope to achieve for the year. For me, this involved thinking of all the unfinished projects I have piled up in the shed. Today I sanded one door on my kitchen hutch before the heat drove me back into the house to stand in front of the air-con. It is a shame the shed doesn't have air-con because I might get more completed in summer if that was the case.


Seeing it is too hot to be outside I have been looking through my magazine stash. A favourite magazine I like is called Flea Market Style. It is an American publication and I order it online here.  I am currently waiting for the current edition to arrive in my letter box. The current issue has a Wedding theme but I bet I can still find lots of inspiration for decorating. (edit: I have the new edition and I am in love with a mirror display that is featured in one of the photos. There are a stack of old gold framed mirrors of different shapes and size grouped together. Love it.)


My Mum recently gave me a book which she knew I would love called New Country Colour - The Art of Living by Susan Sargent. It has some lovely pictures on how the author incorporated colour and texture in her home. It was interesting to read a passage in her book about sameness of modern decore due to people buying packaged looks from stores based on decorating magazine spreads. I have felt that way myself and it was refreshing to read that someone else shared this same view. I do not want to copy the looks featured in mainstream magazines. I do not want someone to walk into my house and say 'that looks like the front cover of this month's Freedom catalogue'. Though people are more likely to walk in and say 'wow you have a lot of toys on the floor'. I want a house to reflect me, though I am still in the transition of working out what that is. Though I know it isn't beige on beige.

My 'likes' board on Pinterest really highlight what I like. Quirky, bright, bold and fun. These are a few of the photos I love. I haven't been able to find the original sources for these photos yet. I always like to credit where things come from and also to go to the original sites and get more information.
Beaucoup des couleurs brights #bohemian bathroom

colors! Do I have room for a piano?  This certainly makes me want to bring one in!
The painted piano comes from www.savvyhousekeeping.com and they have a few other painted pianos including a stunning green one.

Enjoy the start of 2013 and I hope you all manage to keep cool in this heat wave.